
© 1998-


Although the process of rebuilding the heater box outlined herein seems complicated,
it really is not. I included more photos and dialog than is probably needed so that
someone who has never done this, but wants to, could see as much as possible to assist
in their project. A heater box can be rebuilt in one day if you move quickly and
have all the parts you need ahead of time. Overly simplified, the project consists
of the following steps: 1) Remove the heater assembly from the car, 2) Separate the
front & left halves, 3) Prepare all interior metal surfaces so foam seals will adhere
to them-
I have noticed some discussion on the Falcon Discussion Group about the heater design
on our Falcons being inadequate. This has not been my experience. Whenever I have
had a new heater core, a good seal kit and properly working fan in the heater box,
a sound cooling system, and a 180 to 190 degree thermostat, I have never been cold
in my Falcon in the winter-
If you are doing a "from the ground up" restoration of your Falcon, you will want to spend a bit more time on the heater box rebuild than you would if the car is a daily driver and you just want the heater to work at maximum efficiency. By the time I had decided to do this Web site I had already rebuilt the heater box for my '64 Sprint I am fully restoring. The photos below are from the heater box rebuild I did on my '65 Futura hardtop. I did not do as thorough a job on this box as I did on my '64 Sprint's box, but did 90% as good a job. The only real difference between the two jobs is more complete rust removal, and a some attention to the fan motor itself. I just went the extra mile on the full restoration project. The things I did different on the '64 box will be pointed out.
Getting Started
The first step to rebuilding the heater box is to drain the coolant from the radiator and engine. Then undo the heater hoses from the engine, and the water pump. If you have compressed air, blow out the heater hoses to get as much coolant out of the heater as possible. This will help assure not getting coolant on the carpet when you remove the heater box. Be sure to remove the clamps completely from the heater hoses since the hoses will need to pass through the firewall. Also, try to clean any oil, grease, or road grime from the hoses since in all likelihood they will come into contact with some part of the interior of the car during the heater box removal.
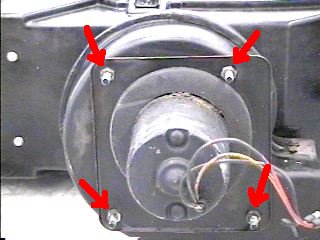
Next, still outside the car and under the hood, disconnect the red and orange wires
to the fan, and remove the black ground wire from the fan to the firewall. Then undo
the four nuts in the engine compartment (passenger side, top of firewall, below the
shock tower brace-
Next, inside the car under the right side of the dash, remove the three cables from the heater control to the heater assembly. One will go to the defrost/floor vent valve (probably cardboard) that sits above the hump. The other two go to the fiberglass heater box itself. When you undo the cables, don't loose the clips that held the cables down. I recommend keeping them attached to the heater box.
Next, undo the fresh air flexible plenum from the cowl to the heater box (it connects
right above the fresh air vent door on the right side of the heater box-
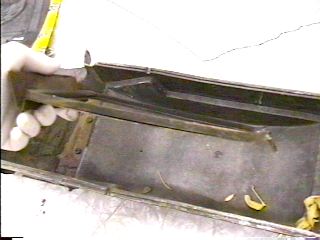
Then gently rock the heater box while gently pulling toward the rear of the car till
it comes free. Slowly pull the heater box down and toward the rear of the car while
assisting the heater hoses to slide through the firewall. If you feel a need to reuse
the cardboard defrost/floor vent valve assembly, take great care here or it will
get broken apart. You can at this point remove the four screws that hold this assembly
to the heater box and remove it first. If you have a large under-

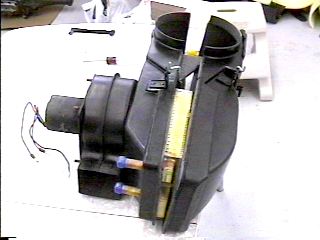
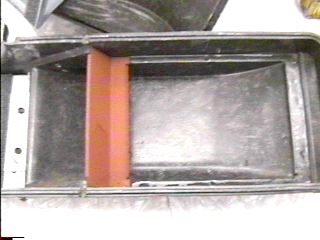
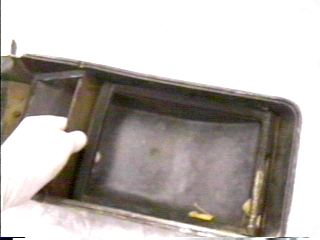
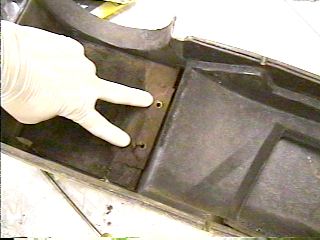
The heater is relatively simple. On the outside of the box is a fan and motor assembly riveted to the rear half of the box. The heater box itself consists of a front half and a rear half. Inside the box there are only four parts; the heater core, the temperature regulator assembly (which is an air mix valve that lets either hot air from the heater core or cold air from outside, or an infinite combination of the two, into the car), the on/off valve door, and small metal air defector (or a larger spacer) in the front half of the box. These individual items will be covered below. Expect to find the metal pieces and assemblies inside the box to be quite rusty. This rust will need to be removed (or the loose rust removed and the solid rust stabilized) and the parts, at minimum, will need to be primed. Otherwise the new foam seal pieces will not adhere satisfactorily and will eventually fall of ruining the seal of the parts in the box. Before, during, and after taking the box apart, inspect the fiberglass halves for damage.
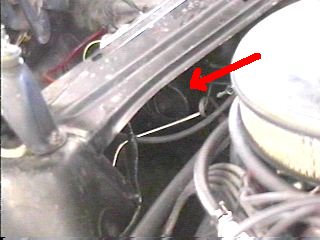
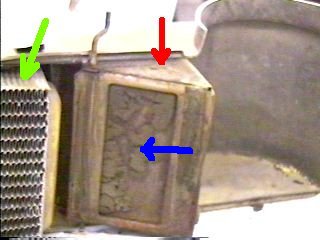
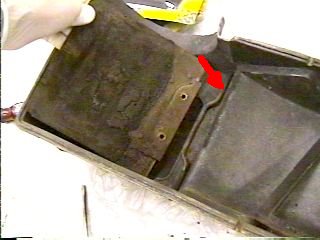
Note in the photos above and below the damage to the fiberglass heater box itself. Although tape is obscuring the complete extent of the damage, the photo on the right shows the bottom of the box where is has been completely broken out and tape had been used to try and seal the box. Note also in both photos above the broken off corner by the door (red arrow in left photo). When the heater is off, this would allow cold air to enter the car. The bottom damage in the right photo would allow cold air to enter the car whether the heater was on or not.
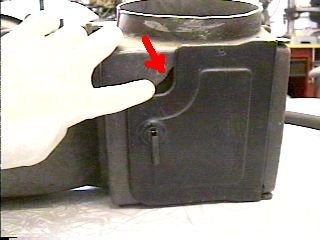
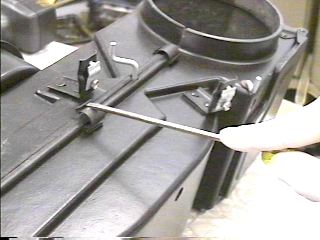
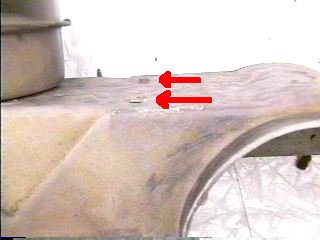
Although this damage is not as severe as in the photos above, this crack (red arrow) would allow cold air to enter the car whether the heater is in operation or not. I got a new heater box front to replace this one. Even then it needed some repair as outlined later.
Before proceeding to separate the heater box halves, remove the heater hoses from the heater core tubes that stick out the back of the unit.
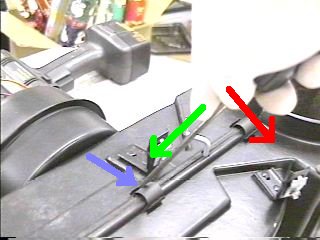
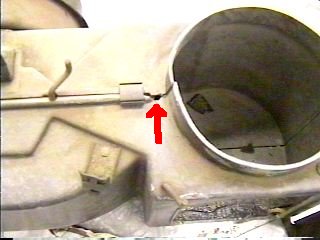
The first step from this point on is to separate the front and rear halves of the heater box. This is done by removing all the metal clips that hold the halves together. There is a certain way to remove these clips to avoid damage to the box. First and foremost, NEVER try to pry them off from the bottom. Insert a screw driver into the slot on either side of the clip (where the blue arrow is pointing in the left photo), and while applying forward pressure to the screw driver in the direction of the green arrow (left photo), pry downward in the direction of the red arrow (left photo) and the clip will slip right off as seen in the right photo above.
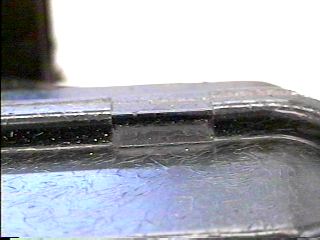
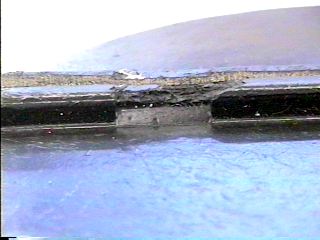
If you pry the clips off from the bottom instead of inserting a screwdriver in the clip as shown above, you will damage the box as seen in the right photo above. The left photo shows an undamaged clip point.
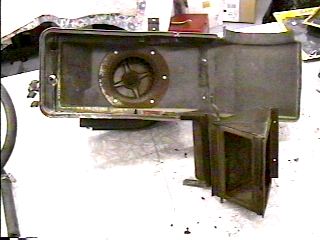
Although this photo was taken after rebuilding everything, this is what it looks like as you separate the halves after all the clips are removed. The heater core usually remains in the back half as the two halves are separated but it doesn't matter if it doesn't.
Once the halves are separated, remove the heater core (green arrow). Although it
might be stuck a bit to the seals, once the halves are separated there is nothing
holding the core in the box. Next remove the temperature regulator assembly (the
center item in the left photo above-
Note the rusty condition of the temperature regulator assembly, and the fan assembly
(in the back of the box in the above left photo). The fan housing assembly is riveted
in place. On my '64 Sprint's heater box I removed the motor and fan from the fan
housing by removing the four nuts shown in the photo on the right above. I then removed
the squirrel cage fan from the motor shaft (which was very difficult due to heavy
rust-
The front half of the box has two parts (not including the outer door which is riveted to the box case). One is the heater on/off valve door (discussed next set of photos), and the other is either a small metal piece to help airflow (orange item in photo above), or a larger metal spacer (two side by side photos below) to adjust for a heater core which is one half inch less deep than earlier cores (this will be covered later).
The left photo above shows the heater on/off valve door still in the front half of the box. Removing the two screws my fingers are pointing to in the left photo will allow the part to be removed. It comes out by pulling it off the rod as seen in the right photo. Again, it will need to have the rust removed and at minimum primed. The rod that the door/valve attaches to (red arrow in right photo) can also be removed by undoing the clip on the bottom. Gently pry one side of the circular clip, then the other, then the first side again, then the other, etc, till it pops off. Don't pry too hard or you may break it. Pull the rod out till it hits the bend, then maneuver the rod till it comes out all the way. Unless you are doing a full restoration, taking the rod out isn't necessary since having a rusty rod in the heater won't prevent anything from functioning properly. On my ‘64 Sprint I removed this the rod, blasted, primed & painted it. On my ‘65 Futura I left the rod in the box without any work on it.
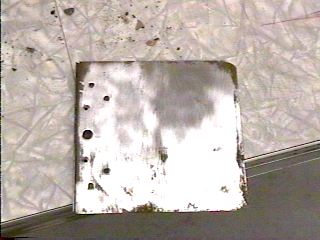
This it the door after wire brushing for just a few minutes. I actually media blasted all the parts for a more thorough job, but, as you can see, wire brushing will do a completely satisfactory job. I would be comfortable spending just a few more minutes on this piece with the wire brush, priming with a good rust neutralizer, and painting. A product from Eastwood Company called Corroless is excellent for coating these pieces with very little or no brushing. It would be an excellent preparation for the temperature regulator valve assembly if you cannot media blast it, since it is very difficult to remove all the rust otherwise. The next best thing to do if media blasting is not an option is to spray or brush on a product like One Step after removing all the rust that is possible, then prime and paint. If you can get most of the rust off, I'd even be comfortable just spraying on Rustoleum primer and paint.
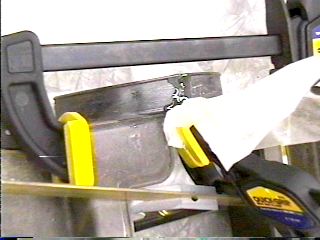
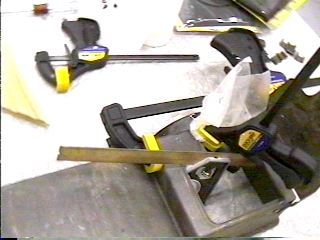
The new front half I got to replace the badly cracked and broken one was not perfect itself, although repair was able and simple to be done. There was a crack completely through the front above the door and another on the right side (which is obscured in the photos above). I cleaned out the cracks as best I could with compressed air and then glued the cracks with 30 minute epoxy cement. I chose 30 minute epoxy rather than 5 minute to allow it time to soak as far into the crack and fiberglass fibers as possible to add strength. As seen above, I used clamps to secure the pieces together and to help keep the box in original shape while the epoxy cured. Wax paper is excellent to separate glued areas from clamps. If gluing any area around the door, be careful to keep a smooth and even surface where the door seals against the box. If a rough edge does happen here, simply sand it smooth after the epoxy cures.
After repairs to the box were made and the rusty areas were wire brushed and primed,
the halves were cleaned up with soap & water and a garden hose using a hand brush
and an old tooth brush to clean thoroughly. After it was dry, a light coat of semi-
Rebuilding the
Heater Box
Part 1
Removing the heater box from the car and dismantling it
This is the end of the Heater Rebuilding Edition
Part 1

Feel free to save this page to your computer for your personal use and future reference-
If you have comments or suggestions, email me at joe@joesfalcon.com