
© 1998-


Improving What You Already Have
By far, the majority of those who work on and restore Falcons and other cars must do so in a standard one or two car garage which is attached to a home in a neighborhood. Often the size/shape of the yard, or neighborhood covenants/restrictions, will prohibit adding on to the existing structure, or funds are not available to do so. In this case one must make do with what he or she has. The purpose of this section is to explore ways of not only making do, but making do efficiently and enjoyably.
While one can do restoration work in a one car garage, (or in one bay of a two car garage while the other bay is used to house a daily driven car), it is far less efficient and less enjoyable. If you have a two car garage and can dedicate the entire garage to your restoration or other project, (which means parking your other car(s) outside till your restoration or project is completed), I highly recommend it. In doing so, you can make the entire garage your workshop with the car actually inside the shop; you can seal it from the outside to keep out dust, dirt, and weather, and you can have a place where you can leave the project and return later with it staying undisturbed. The remainder of this section will concentrate on using and optimizing the entire existing two (or three) car garage for a restoration.
The exact positioning of the car is not so important and can be adjusted for other
items in the garage -
Of high importance, in my opinion, is to make the garage as comfortable as possible. As mentioned above, if you live in an area of extreme temperatures, I recommend either installing an insulated garage door, or buying insulating kits for already installed garage doors. Get a garage door weather stripping kit also to seal around the edges. This is both for temperature conservation as well as keeping dust & dirt out of the work area. Some have actually locked the door closed and caulked around the door to seal it better, and this is a good solution (especially if you expect your project to take years), but there are times when you may well want to open the door to take advantage of a nice day, or to vent fumes from painting or smoke from welding, etc. In addition, you will want to make sure the door to the house from the garage is well sealed to keep fumes & smells out of the living area.
Also, if you live in an area of extreme temperatures you will want to consider heating and/or air conditioning. Heating can be as simple as an electric fan heater or a kerosene heater. You need to be careful and use common sense with any heating device in a workshop. For example, don't use the heater/furnace if you plan to work on any part of the fuel system or spray paint. Gas fumes can still be strong even if the gas tank has been dry for some time, and often there is residual fuel in the lines or bottom of the tank which can spill and create a fire hazard. Air conditioning can be a window unit (if you have a window and can mount the unit so the condenser is on the outside).
In many areas of the country it is common for builders to install the water heater in the garage. If the water heater in this case is gas you will need to observe the same basic precautions mentioned above for heaters when you are working with the fuel components of the car, or painting parts.
You may desire to wall off a portion of the garage for a small shop, but before you
do consider what long term advantages or disadvantages this would offer you when
you are done with your project, as well as how much it will reduce the workspace
around the car. You may well be better off to simply make the whole two-
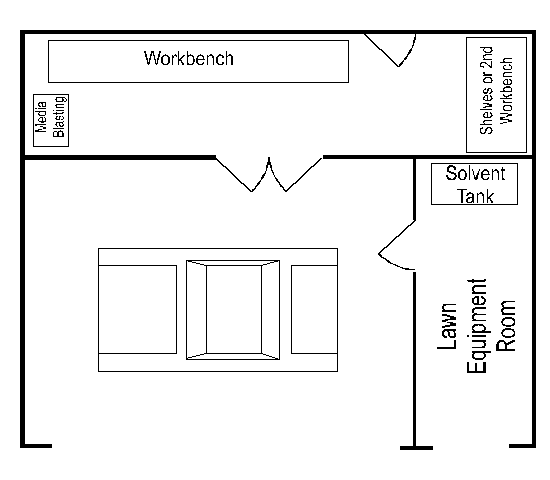
If you have a solvent tank, I recommend putting it in a separate shed outside (with the lawn equipment). If you put a solvent tank in your workspace, the smell of the fumes will end up permeating your upholstery and carpet and will linger with the car for quite a while, long after you have finished the project. Even more to think about are the health concerns of repeated prolonged exposure to these fumes. After spending an hour washing off parts in the solvent tank I usually have a headache and my eyes are stinging some. Having those fumes in the workspace where you will spend hours at a time cannot be good. In addition, with fumes that strong, they will also eventually permeate the walls into the house.
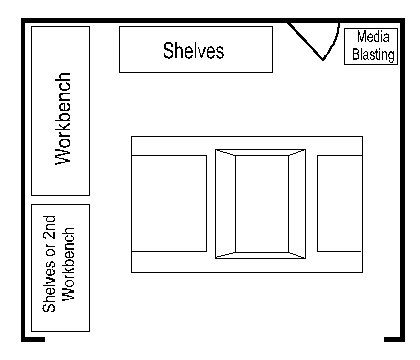
This is just an example of one way to set up a dedicated two car garage. The second
set of shelves on the left can be larger and made ofýÿ wood for larger items, or
it can be a second workbench for bench-
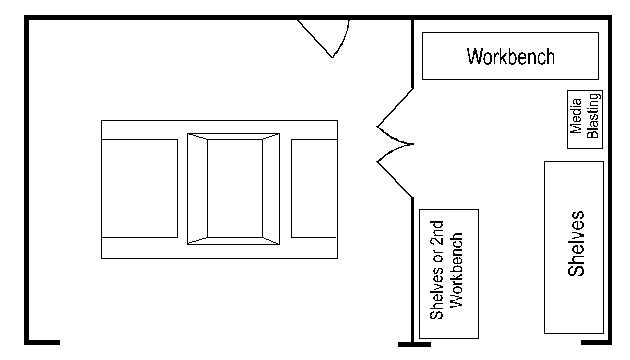
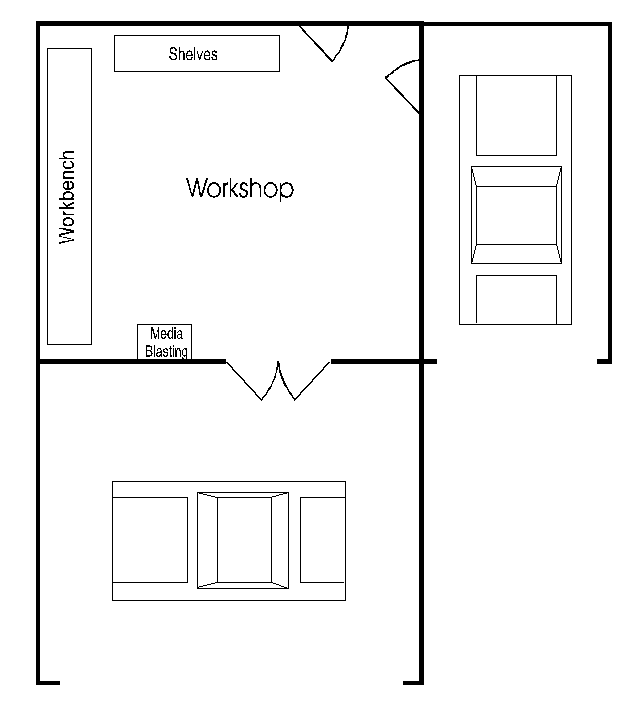
If you have a three-
As an alternative with a three car garage, you can dedicate two bays to the restoration,
and wall off the single bay and use it as a regular garage for a daily driver car
to keep it out of the elements. This approach allows you to still keep your restoration
project isolated from outside elements while also giving a sense of normalcy (for
at least one driver) while your restoration project drags on. If you choose to use
wall off one bay for a workshop, be sure to add adequate lighting both in the shop
and garage, and to add electrical outlets, and (if you have an air compressor) add
several lines for compressed air both in the shop and in the garage. Painting all
the floors is a great plus too, even when the projects are done. Also, after you
are done with the restoration, you can either pull down the wall between the bays,
or you can keep it up and have a separate walled off area of the garage to keep your
newly restored Falcon sequestered from the daily driven side of the garage. The illustration
above also is representative of how you can add-
Designing & Building a Better Home (oops, I mean Workshop)
Now lets discuss optimizing the design and construction of a standard two-
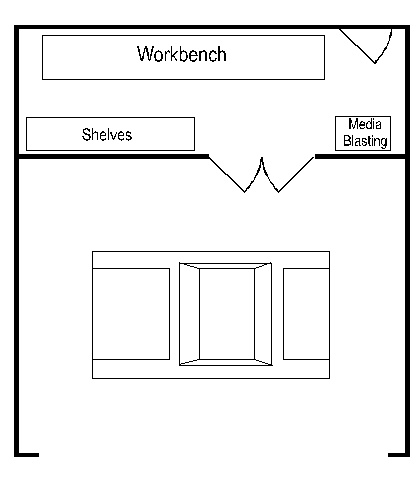
You may need to get inventive with your builder to make such an add-
An additional improvement to the above plan would be to also "stretch" another outside wall (or portion of an outside wall) and make a room for lawn equipment and a solvent tank to keep fumes, smells and dirt out of the garage & shop, as seen above.
If you are building on a cul-
If you have a deep lot to build on consider a variation on the above design. In this case leaving all four bays open to each other gives you flexibility. Building a wall to separate them gives you two separate dedicated areas, one for a standard two car garage, and one for the restoration. If your climate is a colder one, leaving all the bays open to each other gives the advantage of extra "free" heat from a car that has been driven recently and pulled in the garage (of course, you do loose some heat while the door is open pulling the car in or out). On the downside to this obviously is that if you live in a hot climate, the heat from a recently driven car will only make the heat problem in the garage worse. Keeping all the bays open to each other however gives you a great deal of flexibility. My garage (which will be discussed later) is similar to this design above. While it would be nice to have a wall up, I have really enjoyed the greater flexibility of a full open design.
Using your imagination and working with your builder you can explore all sorts of variations on these simple basic designs to get an efficient yet enjoyable workshop at minimal cost. Also, look at some ideas from the "perfect" workshop below and see if you can incorporate some of them on a smaller scale into your design.
The "Perfect" Garage / Workshop?
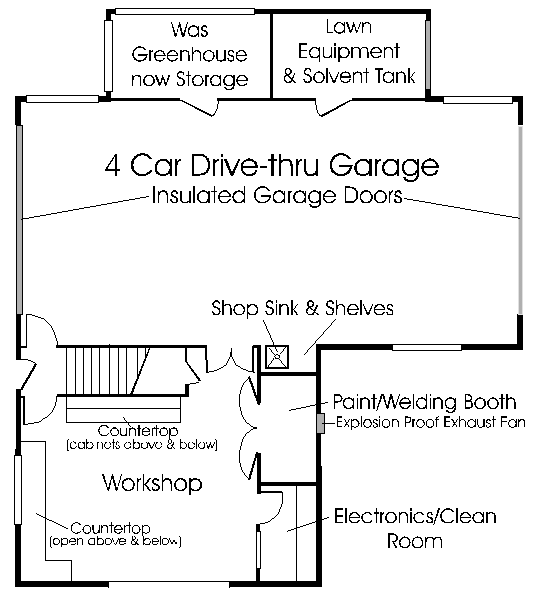
Several years ago we built a new home. We purchased a building lot just a bit further out so we could get one a little larger (for about the same money) than we could find closer in to town. Restoring my Falcon had been on my mind for a number of years and the larger lot would allow us to add a nice workshop and a large garage to the house plans so I could get started on my car. I tried to make this the ultimate residential workshop, and I gave it a great deal of thought. And I did many things right in the design. However, I did not foresee some very critical needs as well as many niceties that would have made the design much better. My present garage and workshop is shown below.
What Is Right About This Design
The main advantage to this design is that it has a large "drive-
The garage is fully insulated with insulated garage doors. This is a big plus, especially
for working in the garage during winter months. Even after the restoration is complete
an insulated garage is much kinder on cars and protects them from severity in temperatures.
In the winter time, the heat alone from a car, after putting it in the garage and
closing the garage door, will very quickly heat the garage into the 70's (mid 20's
Celsius) and is enough to keep the garage in the upper 50's to low 60's (10 to 15
degrees Celsius) all night long even when it is below freezing outside. Not only
does this add life to your car, it adds greatly to creature comforts when getting
in the car on a cold morning. With this garage style, I use two bays for my Sprint
restoration (right in the middle on stands) and still have two bays for two family
cars to use normally. I have, a time or two, put one car dead in the middle of the
four car garage to do work on it, and I really ended up with a feeling of spaciousness
during those particular projects (I did this while I dismantled my Sprint). Also
with a "drive-
Probably the most valuable aspect of this design though is the heated and air conditioned workshop. Having an "indoor" climate controlled place to take a part into to work on is truly nice. In addition, often I am forced to stop in the middle of a project and leave on a trip for a few days and it is nice to have a place I can leave work in progress, knowing it will stay clean, and be undisturbed (especially important is that it is kept undisturbed by the kids) until I return. A separate dedicated work room or workshop also gives you a place to do work on "smelly" projects (like overhauling a carburetor) without getting the smells into the living area of the house. As mentioned above, I have seen several "workshops" attached to garages over the years which range from a 4' x 5' room walled off inside the garage, to ones similar to mine and even larger. More important than the size of the workshop, is the fact that you have a "workshop". A door going from the shop into the garage is also nice so you don't need to go "outside" to get from one to the other, which is especially important during inclement or severe weather. I've been able to work on my car, freely moving from the shop to the garage uninhibited during severe thunderstorms, ice storms, 115 degree heat, etc. This is probably the most desirable plus in this or a similar design.
Another plus is the separate "electronics" or "clean" room. In jr. high and high
school I was quite an electronics buff. One of the first things I learned is that
electronic items can be sensitive to dust & dirt. I decided that I didn't want to
be in the middle of a several day electronic project or repair, and then find the
need to repair a wood item that was going to make a lot of dust. So I made a separate,
walled off, area in the shop with a door that I can close and keep things inside
clean no matter what I was doing in the shop. This, however, has not only been nice
for electronics, but I have discovered there are many needs to keep items clean such
as storing an engine on a stand during assembly, keeping a carburetor clean during
overhaul or storage, etc. Such a room is also a nice place to store the kids Christmas
presents (the wife's too for that matter -
Another plus is the separate "paint" booth with an explosion proof exhaust fan. (Important
Disclaimer: Although I show a room labeled "Paint Booth" in these illustrations,
and while I personally do use this room for painting, I do not encourage or recommend
anyone else doing exactly what I have done here, and I take no responsibility for
anyone else who decides on his/her own to do something similar to this design. The
reason is that code restrictions in most areas require something like 50' distances
from a paint booth to any electrical outlets, light fixtures, electrical switches,
electrical panels, etc. My entire shop is only 20' across -
Two final thoughts on this design; Having some cabinets above and cabinets & drawers below one of the counters in the shop has been nice for storing everything from caulk and plumbing supplies, to hobby items and shop towels. The shop sink in the garage has also been indispensable.
One major advantage has been the separate room for lawn equipment. It keeps the equipment out of the garage, along with all the dust, dirt, grass clippings, and gasoline smells. In addition, I have put the solvent tank in that room so that I can keep the "smelly" stuff all together.
What I'd Like To See Different In This Design
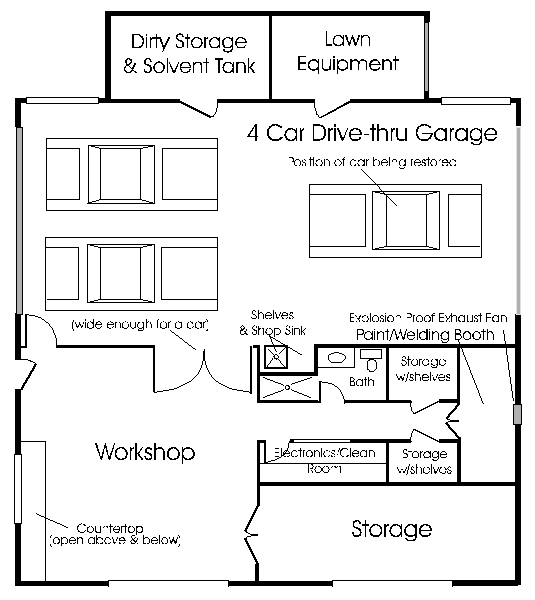
The lower right corner is what I would add to my present design. The large storage
room and the two smaller storage rooms with built-
While this design is certainly nice, it lacks two major items; one is storage, the
second is open floor space against a wall for free standing tools like a belt sander,
drill press, or table saw. The storage issue is far more serious than I ever thought
it would be. I use the shop for woodworking, household repairs, occasional light
metal fabrication & work, and general car maintenance, in addition to its current
major use in restoring my '64 Sprint. For all these uses, storage is paramount. For
example, there needs to be a place to store wood such as 4' x 8' pieces of plywood,
sheet rock, paneling, etc., hardwoods, moldings, conduit, PVC pipe, supplies, paints,
etc. Of course, for a restoration you need tons of storage space. In the first edition
of this web site I outline the need for organization during a restoration, and recommended
getting shelving to put refurbished and new parts on to keep them organized and clean.
A separate storage room would be ideal for such shelves. In addition, there are numerous
larger items that cannot easily be stored on shelves such as engines, rear ends,
transmissions, bumpers, etc. Consideration should be given to accommodate these things
in the storage room too. My garage, in addition to being the place where I am restoring
my Sprint, is also the garage where the family cars are parked and the kid's bikes
& trikes are kept. There just isn't room to store other items there. In addition,
since the garage doors are open much of the time (so kids can get to their stuff)
a lot of dust & leaves end up getting inside. This makes my garage a poor storage
area. Actually, I did start with the shelves in the garage, but all the parts began
to get real dusty & dirty, and even though the garage is fully insulated, they were
still constantly exposed to extra heat and humidity in the spring, summer & early
fall months. I realized that I either needed to park all the cars outside till the
restoration was done, or move the parts into the heated/air conditioned workshop,
which I did. This has worked well, but it has also taken up valuable floor space
in the shop. A separate storage room, also heated & air conditioned, is the best
way to go. Closet-
Optimizing
Your
Workspace
Part 2
Workshop Layouts & Designs
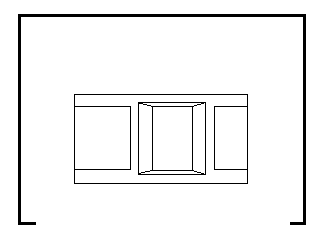
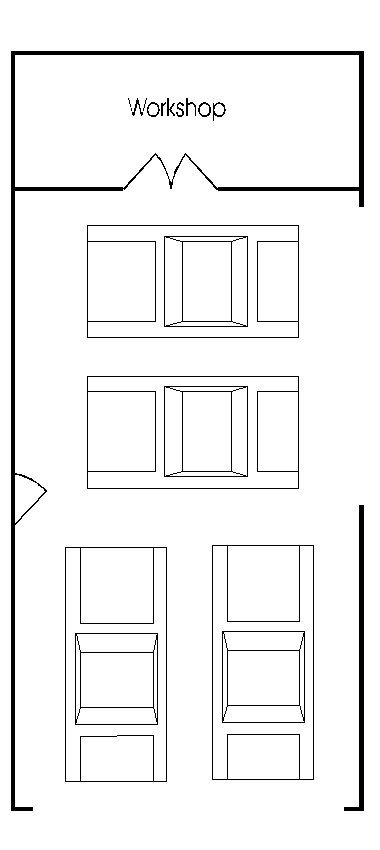
The best setup for me is to put the car in the garage sideways as shown above. This gives you ample room to get to all sides of the car while leaving some space for a workbench or other tools.
This is the end of the
Optimizing Your Workspace Edition

Feel free to save this page to your computer for your personal use and future reference-
If you have comments or suggestions, email me at joe@joesfalcon.com