
© 1998-


The original windshield washer system consisted of a vinyl bag mounted on the left side of the engine compartment just forward of the shock tower. A hose runs from this bag through the firewall and into a manual foot operated pump. A second rubber hose goes from this pump back through the firewall and connects to jets in the cowl area that are pointed at the windshield. Operation of the washer was accomplished by pressing a lever (that Ford calls a Washer Pedal) under the dash on the left of the steering column with the driver’s left foot. This compressed a rubber “bellows” which forced fluid from the bellows through a hose to the washer jets. Integral with the fluid pump assembly under the dash is a switch that operates the wipers while the pedal is pressed. While Ford's original idea of a manual foot operated pump for windshield washing is novel, it is less than ideal for a daily driver car. Also, with the manual foot pump, washer fluid lines are routed into the passenger compartment, so a leak in a hose, in a hose connection, or in the pump itself can soak and mildew the carpeting if not caught early (which was fairly common as the cars aged). If you are doing a "from the ground up" restoration of a Falcon to stock condition and want to keep the original setup, you can obtain new rubber parts for the foot operated pump from most of the Falcon vendors, and replacing those parts is covered herein. I am keeping the manual foot operated pump on my '64 Sprint that I am restoring. However, I felt an electric pump was best for my '65 Hardtop since it is a daily driver and will see far more use. Since the conversion to electric is similar to replacing the manual foot pump parts, it is also covered herein. Both the repair of the manual system, and the conversion to electric is easy as will be seen below. In addition, the electric conversion still uses the same foot pedal for activation as the manual pump. The first two photos are from my Sprint, the rest from my '65 Hardtop.
Rebuilding the Manual Foot Pump
Pressing the windshield washer pedal does two things: first, it pumps washer fluid
to the jets and onto the windshield, and secondly it starts the wiper motor-
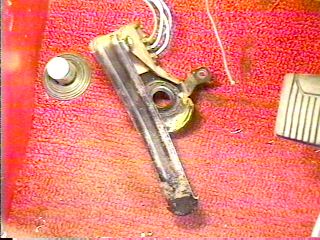
The photo on the left above is the foot pump/wiper activation assembly after it has
been removed from the firewall and after the actual pump bellow parts have been removed.
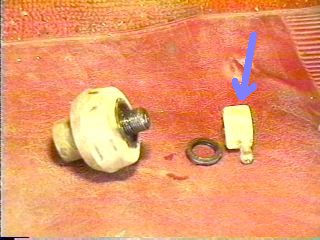
The pump parts can be seen in the right photo above. To remove the manual pump bellows,
first remove the hose from the reservoir bag in the engine compartment, then pump
the pedal under the dash until no more fluid comes out the jets. Remove the rubber
hoses from the back of the foot pump under the dash (take care to catch any washer
fluid that remains in the hoses so you don't get the carpet wet), then unscrew the
piece the hoses connect to (blue arrow in right photo above) with a wrench. The pump
bellows fit tightly between the bracket and the pump pedal arm so it will need to
be compressed by squeezing the pump while moving it to the side to get it out. Again,
take care not to wet the carpet-
Converting to an Electric Pump
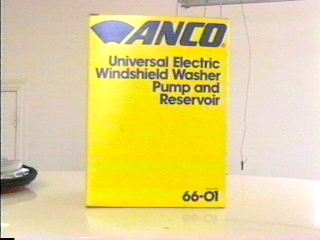
I used the Anco universal kit #66-
First, follow the above procedure in the repairing the manual washer pump section of this page for removing the old manual pump parts, then proceed with the following instructions.
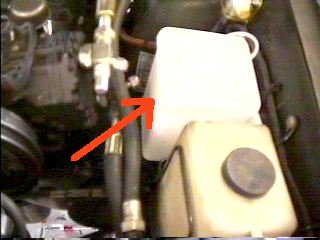
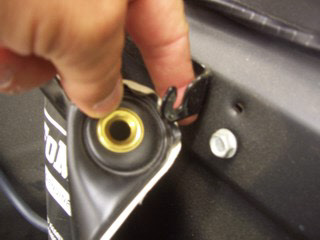
First, I mounted the reservoir in the engine compartment on the drivers side in the
same place that the stock bag went. In the photo above the front reservoir is for
engine coolant, the rear one is the new washer reservoir (red arrow). The reservoir
comes with four mounting arms on the back; two each side and two on the top. As you
can see above, there is a wiring bundle directly above the reservoir. Not as easy
to see is the fact that there is a ridge below the wiring bundle where the original
bag bracket was mounted. Using the mounting arms that stuck up above the reservoir
would have put it at a bad angle as well as interfered with the wiring bundle. As
a result, I cut off the top arms and used the side arms for mounting. The wiring
consists of a short black wire that goes to ground, and a much longer red wire that
goes through the firewall to the switch. There is one rubber hose (included) from
the reservoir that goes up to the existing jets behind the hood that stick up into
the cowl vent slats and aim at the windshield. I ran the red wire and rubber hose
along with the existing wiring bundle to the firewall using existing wire harness
straps for a neat looking installation. If you can not find a suitable hole through
which other wires are going through the firewall, drill a hole in the firewall for
the red pump wire and install a grommet into it and slip the wire inside the car
(you may need to cut off the crimped terminal to get the wire into a small hole in
the firewall, and then re-
Again, the above left photo is of the assembly after the manual pump parts have been removed. As a matter of fortunate coincidence, the momentary contact push button switch that comes in the kit happens to fit perfectly in the same hole as the manual pump did, as seen in the right photo above. However, while it fits the hole perfectly it is slightly deeper than the original pump (a little over 1/4"), which prevents the screws from tightening all the way when the assembly is remounted to the firewall. However, by adding washers between the bracket and firewall, I didn't find this to be a problem since the screws are long enough to compensate. Before securing the assembly to the firewall, hook the red wire from the pump (that you put through the firewall earlier) to one side of the switch. Tap into a fused wire from the accessory circuit (or attach a wire to the back terminal of the ignition switch and fuse it) and attach it to other side of the switch (be sure to disconnect the battery before making the electrical connections). Then attach the assembly to the firewall. Fill the reservoir with washer fluid and test the system for operation and leaks.
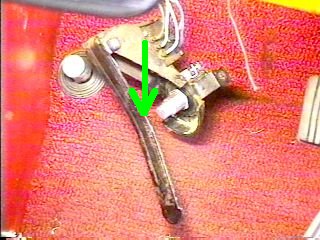
In operation, the wipers come on with very little pedal movement, and the washer
comes on when the pedal is almost to the floor. If desired, a spacer can be added
on the pedal itself, between the pedal and the switch (green arrow in right photo
above) so that the washer comes on with less pedal movement-
Overview
Rebuilding the Windshield Washer System
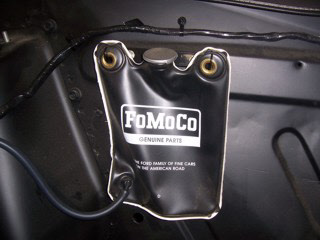
This shows the new Windshield washer bag in my Sprint (new bags are available from most all Falcon vendors). The hose goes upward and joins the wiring bundle you see above the bag and goes through the firewall. The right photo shows the bracket for the bag. Many Falcon owners who acquired their Falcon in the mid 70’s or later thought they had no windshield washer system since this bag and hoses were missing. Many have even wondered what this bracket in the right photo was for. If you fall into that category, now you know.
This is the end of the Rebuilding the
Windshield Washer System Edition

Feel free to save this page to your computer for your personal use and future reference-
If you have comments or suggestions, email me at joe@joesfalcon.com